How to install PHP 8 on Windows 10
PHP 8 is on the way. In this tutorial, I will show you how to install PHP 8 on your Windows 10 machine using Apache as a webserver.
Download the necessary files
You can download PHP binaries from the URL: https://windows.php.net/download/.
Currently, the final version of PHP 8 has not been released, therefore, it cannot be found on the main page. Select the "QA Releases" from the top menu or navigate directly to https://windows.php.net/qa/.
Download the thread-safe, 32, or 64-bit version depending on your Windows type. As all versions have been compiled with VisualStudio 16 (2019), so later, you need a suitable Apache binary and a "Microsoft Visual C++ 2019 Redistributable" package installed on your PC.
Prepare PHP location
I like the programs to be in the Program Files folder. Besides this, over time, you will install several different versions of PHP. Therefore, I create the following directory structure:

For the sake of ease of use, I make some sacrifices in the security of my development machine. I give local users full permission to the PHP directory on my machine.

Once you have created the directory, copy the contents of the downloaded zip file.
Check if PHP works
As I mentioned earlier, PHP 8 was compiled with Visual Studio 2019. Thus, if the appropriate Redistributable is not installed on your machine, you will get the following error:
... VCRUNTIME140.dll was not found. ..
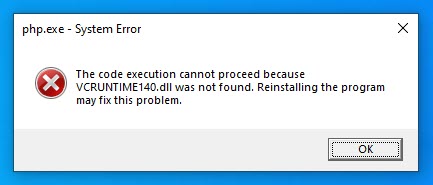
You can download the file from Microsoft Redistributable download
If all went well, you can use PHP from the command line. You can check the installation with the command: php -v and the result should be something similar:

To make working with PHP more convenient, you can put the PHP directory on the path. Click on start and just type env. From the list click on "Edit the system environment variables" and the System Properties dialog will appear. Click the "Environment Variables..." and select "Path" from the System variables block. Add the new PHP folder to the list.

Configure PHP
Now PHP is running but not yet configured properly. Configuring PHP 8 at the base level is no different from older versions.
The PHP folder contains 2 example configuration files:
- php.ini-production
- php.ini-development
Copy the development version to the same directory as php.ini and open this for editing. What you need to set is the location of the extensions and session data.
You have to set the extension_dir parameter to the valid location: extension_dir = "c:\Program Files\PHP\php-8.0.0RC2\ext"
extension_dir = "c:\Program Files\PHP\php-8.0.0RC2\ext"
You also have to uncomment the required extensions from the list. Usually, the curl, gd, mbstring, mysqli, pdo_mysql extensions are required for complex php apps.
extension=curl
extension=gd
extension=mbstring
extension=mysqli
extension=openssl
extension=pdo_mysql
Finally, you need to set the location where to save the session data: session.save_path = "w:/tmp"
session.save_path = "w:/tmp"Installing Apache
Even if PHP has a built-in web server, production systems use Apache, Ngnix, Lightspeed, and so on. For a Windows development environment, Apache is the easiest choice.
You can download the latest Apache webserver from the ApacheLounge website. Download the 32 or 64-bit version depending on your OS type.
As I mentioned before, I don't like everything in the C: root, so I also create a directory for Apache in the Program Files folder. Don't forget to allow permissions for the users.
Now you can copy the content of the Apache24 folder of the zip file to the new location. Pay attention to the exact directory structure.
As with PHP, you can add Apache to the path, but in this case, you need to add the bin folder.
Basic Apache configuration
Apache configuration files are located in the conf directory. The main config file is the httpd.conf . To start the webserver you need to set the server root (SRVROOT) parameter in the config file to the correct location as follows:
Define SRVROOT "c:/Program Files/Apache/httpd-2.4.46"

ServerRoot "$ {SRVROOT}"
It is a good idea to set the ServerName explicitly to prevent problems during startup. As we will use virtual hosts later, you can simply set it to localhost:80
ServerName localhost:80An optional step - but usually required by most PHP applications - to enable Apache modules. For example, the mod_rewrite module is disabled by default but almost always required. Just uncomment the line and you are done.
LoadModule rewrite_module modules/mod_rewrite.soInstall Apache as a service
To install Apache as a windows service, you have to open a command prompt as an administrator. Navigate to the Apache bin directory and execute the command: httpd -k install
Then you can start the webserver using httpd -k start
Allow access:

If everything is correct, then you get the prompt back without any message.

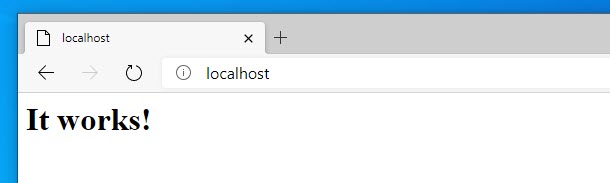
Open a browser and type http://localhost as the URL. You should get a welcome page similar to this:
Setup virtual hosts
The default document location is the htdocsfolder in the installation directory. However, this is not optimal. If you are a developer, you probably work on multiple web projects. So it would be nice to have a dedicated folder and URL for each project. For example, if site1.com and site2.com are the production sites, then you probably want a site1.local and site2.local URLs with a dedicated target folder for your development.
Virtual hosts are the solution to this problem.
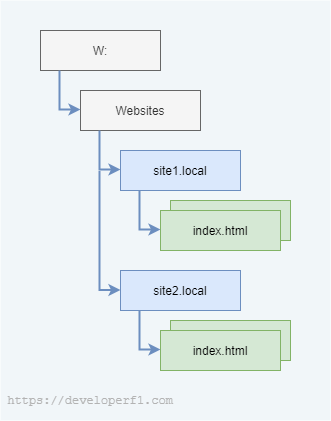
Again, it is a good idea to store your code separated from drive C.
For example, you can create a directory structure like this:
Now you have to configure virtual hosts and enable it. First, open the httpd.conf file and uncomment the line that includes the httpd-vhosts.conf file.
# Virtual hosts
Include conf/extra/httpd-vhosts.conf
Then, open the httpd-vhosts.conf file that is in the extra folder. Add one entry for each project you want. The ServerName , DocumentRoot , and ErrorLog are the important parameters, you can skip the others.
<VirtualHost *:80>
    ServerName site1.local
    DocumentRoot "w:/Websites/site1.local"
    ErrorLog "w:/Websites/site1.local/error.log"
</VirtualHost>
Besides this, you have to allow access to these folders so add a common Directory block with the following content before the VirtualHosts entries.
Your final virtual host config file should look like this:
<Directory "w:/Websites" >
    Options FollowSymLinks
    AllowOverride All
    Require all granted
</Directory>

<VirtualHost *:80>
    ServerName site1.local
    DocumentRoot "w:/Websites/site1.local"
    ErrorLog "w:/Websites/site1.local/error.log"
</VirtualHost>

<VirtualHost *:80>
    ServerName site2.local
    DocumentRoot "w:/Websites/site2.local"
    ErrorLog "w:/Websites/site2.local/error.log"
</VirtualHost>
You also need to extend the Windows hosts file that is located in c:\Windows\System32\drivers\etc\hosts. Open the file for editing with administration privileges and add the server names used before to the file pointing to the local 127.0.0.1 IP address.
# localhost name resolution is handled within DNS itself.
#	127.0.0.1       localhost
#	::1             localhost

127.0.0.1 site1.local
127.0.0.1 site2.local
Put a simple index.html file in the site roots with different content for testing purposes.
Now you can restart Apache using httpd -k restart . If everything is correct, then no error message is displayed. Navigate to site1.local and site2.local, and your browser should display the corresponding Html content.
Setup Apache to use PHP 8
The setup is almost done, but we haven’t configured PHP and Apache to work together.
First, we have to add the php extension to the known mime types. To do this, add the following line at the end of the mime.types config file: application/x-httpd-php php
application/x-httpd-php phpTo execute the index.php automatically if a directory is requested, extend the DirectoryIndex property with index.php in httpd.conf .
<IfModule dir_module>
    DirectoryIndex index.php index.html
</IfModule>
After that, the most important step is to load the php module. To do this, specify the PHP install directory and the appropriate module in the httpd.conf file. Just insert the lines at the end of the httpd.conf :
# PHP 8.0
PHPIniDir "c:/Program Files/PHP/php-8.0.0RC2"
LoadModule php_module "c:/Program Files/PHP/php-8.0.0RC2/php8apache2_4.dll"
Now you can restart apache and check for any error. If everything is fine then create a small inf.php file in the server document root with a simple phpinfo like this:
<?php
    phpinfo();
Visiting site1.local/info.php should result in a PHP information page in your browser.

Troubleshooting
The "Can't locate API module structure 'php8_module' in file ..." error message is a common problem. Verify that exactly php_module is in the LoadModule line. Neither the old php7_module nor the expected php8_module is good.
Video